Introduction
Magento is widely recognized as a robust e-commerce platform celebrated for its flexibility and scalability. Its comprehensive email capabilities are crucial for effective customer communication and marketing strategies. Email plays a pivotal role in e-commerce by fostering customer relationships, driving sales through promotional messages, and delivering essential transactional notifications. Magento’s email system offers built-in features for various types of communications, including order confirmations and shipment notifications. Additionally, businesses can customize email templates to align with their brand identity, ensuring consistent and impactful messaging across customer interactions.
Agenda
-
Discovering Magento Email
Email Templates
Location of email templates in the Magento directory:
-
Email templates are stored in the
<module_dir>/view/<area>/email -
How to create new email template by admin panel:
-
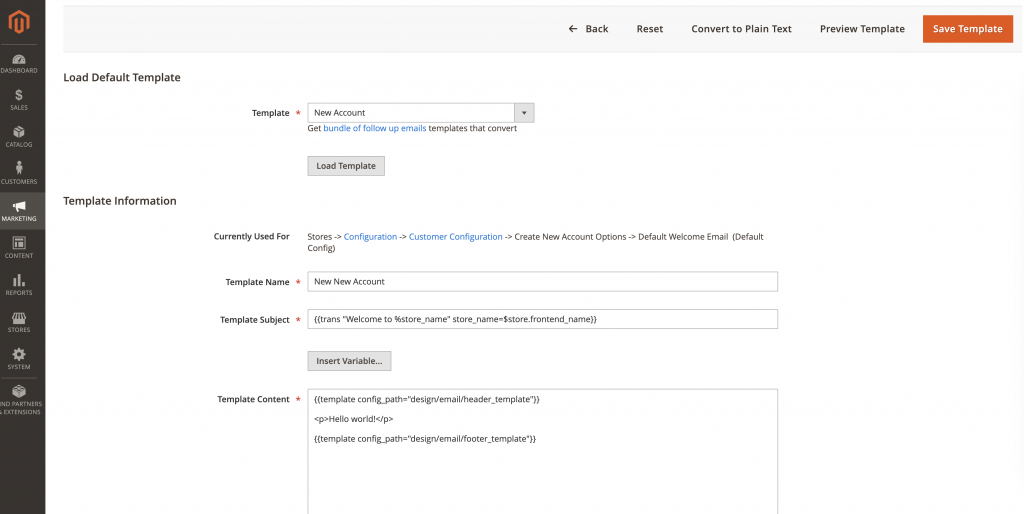
Example Create “New New Account” email template to override Magento’s default
-
Create new template using admin panel
-
Select “New Account” on Load Default Template / Template
-
Set Template Name value is “New New Account”
-
Modifie Template Content:
-
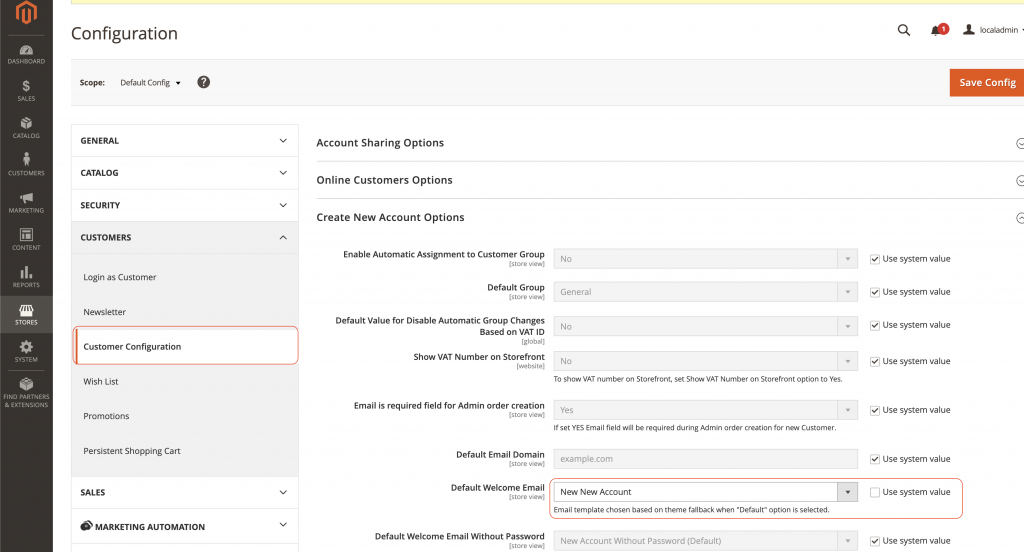
Navigate to Stores > Configuration:
-
On the Configuration page, expand the General tab on the left, select Customer Configuration, on the right select Create New Account Options > Default Welcome Email change value to “New New Account”
-
-
-
-
How to create new email template by code:
-
Defining email templates in email_templates.xml:
-
email_templates.xmlis used to define email templates and their metadata.
-
-
Create the corresponding template file in
app/code/Vendor/Module/view/frontend/email -
Example:
-
create file
email_templates.xml:
Copy to Clipboard -
create file
app/code/Vendor/Module/view/frontend/email/order_confirmation.html:Copy to Clipboard
-
-
How Magento loads the specified email template file:
-
Magento\Framework\Mail\Template\TransportBuilderis a class in Magento 2 used to build and send email messages based on templates. This class is part of theMagento\Framework\Mail\Templatenamespace and is responsible for configuring and preparing emails to be sent, including setting the template, variables, recipients, and other email headers. -
Using
getTransport()->sendMessage()to send the email.-
Example of creating and sending email templates:
Copy to Clipboard-
setTemplateIdentifier: specifies the email template to use.
-
setTemplateOptions: sets the template options, including the area and the store ID.
-
“area”: This specifies the application area where the template will be used. By specifying the ‘area‘ as
Area::AREA_FRONTEND, the email template is rendered with the same context and settings as the frontend area. -
“store”: Specifying the “store” ensures that the template has access to the correct store’s settings, configurations, and variables. This is essential for multi-store setups where different stores might have different configurations and customizations.
-
-
setTemplateVars: sets the variables to be used in the email template.
-
setFromByScope: sets the sender’s email scope.
-
addTo: adds the recipient’s email and name.
-
getTransport: returns the transport object to send the email.
-
-
-
Environment Emulation: is used in Magento to emulate a specific store’s environment. This means it temporarily changes the current store context to the specified store, allowing you to execute code as if it were running within that store’s context. This is particularly useful when sending emails or generating content that is store-specific.
The typical usage of environment emulation involves three steps:
-
Starting the Emulation:
startEnvironmentEmulationis called with the store ID and the area (e.g., frontend, adminhtml). -
Performing Actions: Actions that require the specific store context (e.g., sending an email, generating a PDF) are performed.
-
Stopping the Emulation:
stopEnvironmentEmulationis called to revert back to the original store context.Example:
Copy to Clipboard
-
-
-
In the example above we can see many syntaxes such as:
{{template config_path=””}} {{var …}} {{trans …}}. So how can Magento handle it?-
The interface
vendor/magento/framework/Filter/DirectiveProcessorInterface.phpwill answer this question. There are some Directive classes which implementsDirectiveProcessorInterface. You can find them undervendor/magento/framework/Filter/DirectiveProcessor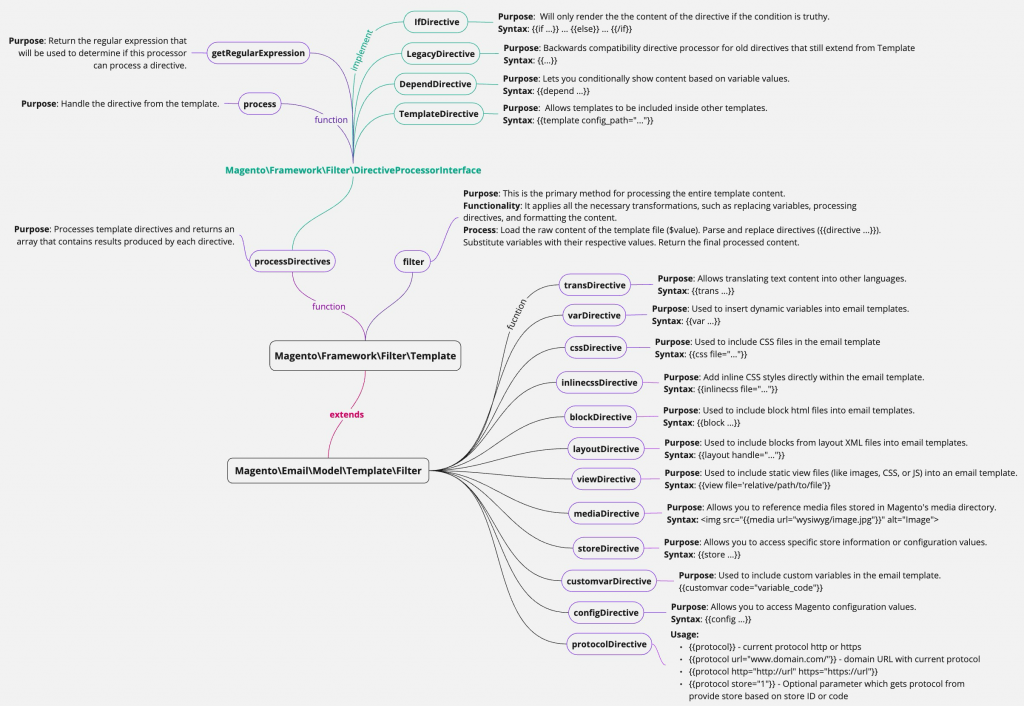
-
-
We can customize a directive, example: create a directive to handle “if not”
-
Create
di.xmlfile to define “if not” directiveCopy to Clipboard -
Create class IfNotDirectiveProcessor for handle “if not”
Copy to Clipboard -
To use this directive we use the syntax
{{ifnot ...}} ... {{/ifnot}} -
Example:
Copy to Clipboard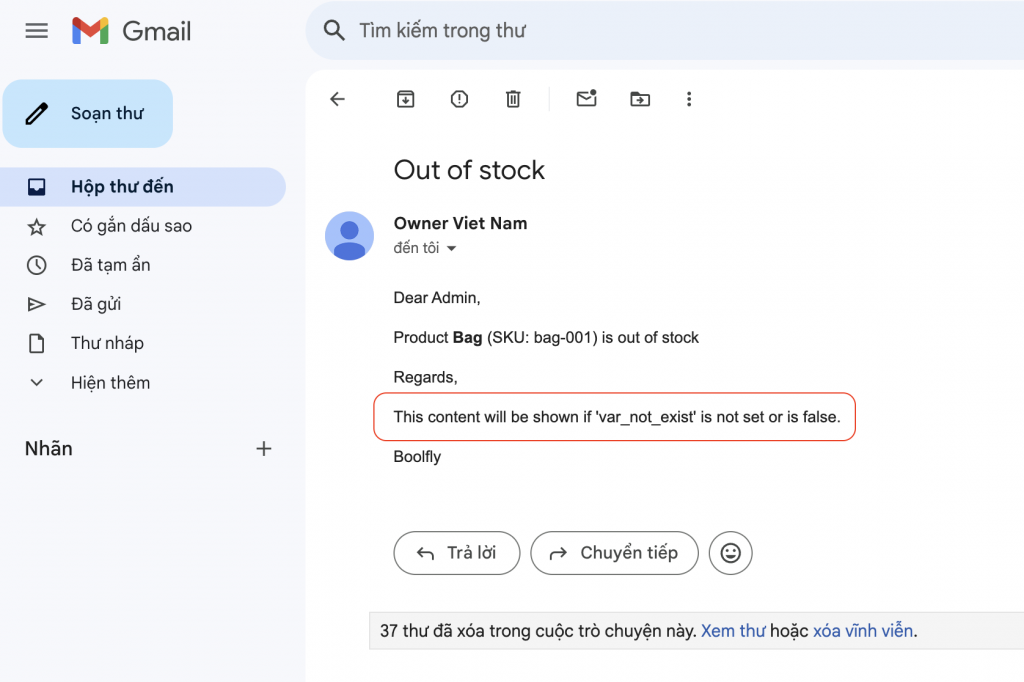
-
-
Email Queues
-
Managing email queues for large-scale email sending: In Magento, by default, there is support for asynchronous email sending for “Sale Order” emails to help handle large volumes of emails to increase performance, essentially just using Cronjob to handle email sending.
-
Order in magento use two attributes “email_sent” and “send_email” included with the sales_order table to check and send emails when this config is enabled. To process the “email queue” Magento sends off emails to entities where the email_sent value is null. The maximum number of emails per send is the value of “sales_email/general/sending_limit” config.
-
To configure the Email Queue in Magento 2, follow these steps:
-
Log in to your Magento 2 Admin Panel.
-
Go to Stores > Configuration.
-
Under Configuration, select Sales > Sales Emails.
-
Expand the General Settings section, and you’ll find the “Asynchronous sending” option.
-
Configure Settings: Enable the “Asynchronous sending” option, and you can adjust the other settings as needed.

-
-